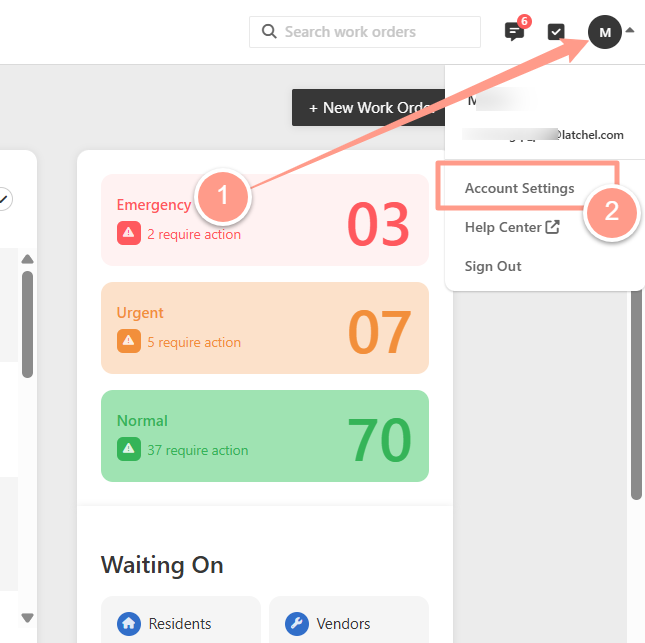
From your Latchel Dashboard, click the initials of your account located at the top right corner. And on the dropdown, select Account Settings.
Then on the Severity/Responsibility tab, click the ellipses to show Edit Presets.
On the Severity and Responsibility Presets page, you can:
- Add a new preset
- Add a new setting to an existing preset
- Edit an existing preset
- Delete an existing preset
We’ll walk through each of these options in the sections below.
Add a New Preset
Follow steps above in order to access the Severity and Responsibility Presets page. Then, click +New Set.
Enter the name of the new preset and provide a description for the settings set. Click Create to save.
Your new preset will now appear in the list of available presets. You can now edit it to add responsibility settings and their corresponding severity controls.
Add a New Setting to an Existing Preset
Click the name of the preset to which you want to add new settings.
Then, click +New Setting.
You will be prompted to choose a problem & location combination. Start by clicking Choose Problem.
Choose from the list of Problem Categories by expanding the desired category. Locate the problem within the selected category, then click Choose.
Next, configure the location settings by clicking, Choose Location.
Expand the list of location settings, then click Choose next to your selected location.
Next, choose how jobs created with this Problem/Location combination will proceed:
- Approval Required – Jobs under this setting will require your approval before processing.
- Resident Responsible – Residents will be responsible for the costs of any future jobs under this setting.
- Control Severity – Select the appropriate severity level:
- Normal
- Urgent
- Emergency
Click Save once you’ve finished setting the problem priority.
The new setting will now be added to the preset.
Edit an Existing Preset
If there are problems or location settings you need to edit on existing presets, here how you can do it.
Click the hyperlinked name of the preset, then search for the problem category.
Find the setting you wish to update, then select the new severity by clicking the corresponding radio button or checkbox.
Delete an Existing Preset
If a severity and responsibility preset is no longer needed, you can easily remove it to keep your settings organized and up to date.
To delete a preset, click the hyperlinked name of the preset.
Click the ellipses at the top right, then finally click Delete.
Deleting a preset will remove all custom handling instructions tied to that issue type. Any future work orders that would have matched this preset will follow your fallback settings instead.